Modules are add-on features you can turn on for your website. Think of them like apps you install on your phone -- each one adds new abilities to your site.
Your site starts with the basics: pages, media uploads, and user management. When you need more, you enable a module, and new tools appear in your dashboard right away.
What Are Modules?
A module is a feature pack that adds a whole new section to your website. For example, the Articles module gives you everything you need to run a blog. The E-Commerce module lets you sell products online.
You only pay for the modules you actually use. If you do not need a blog, do not enable the Articles module -- and you will not be charged for it.
Viewing Available Modules
To see all the modules you can add to your site:
- Log in to your dashboard.
- Look for Modules in the left-hand menu.
- You will see a list of all available modules, showing which ones are currently turned on and which are off.
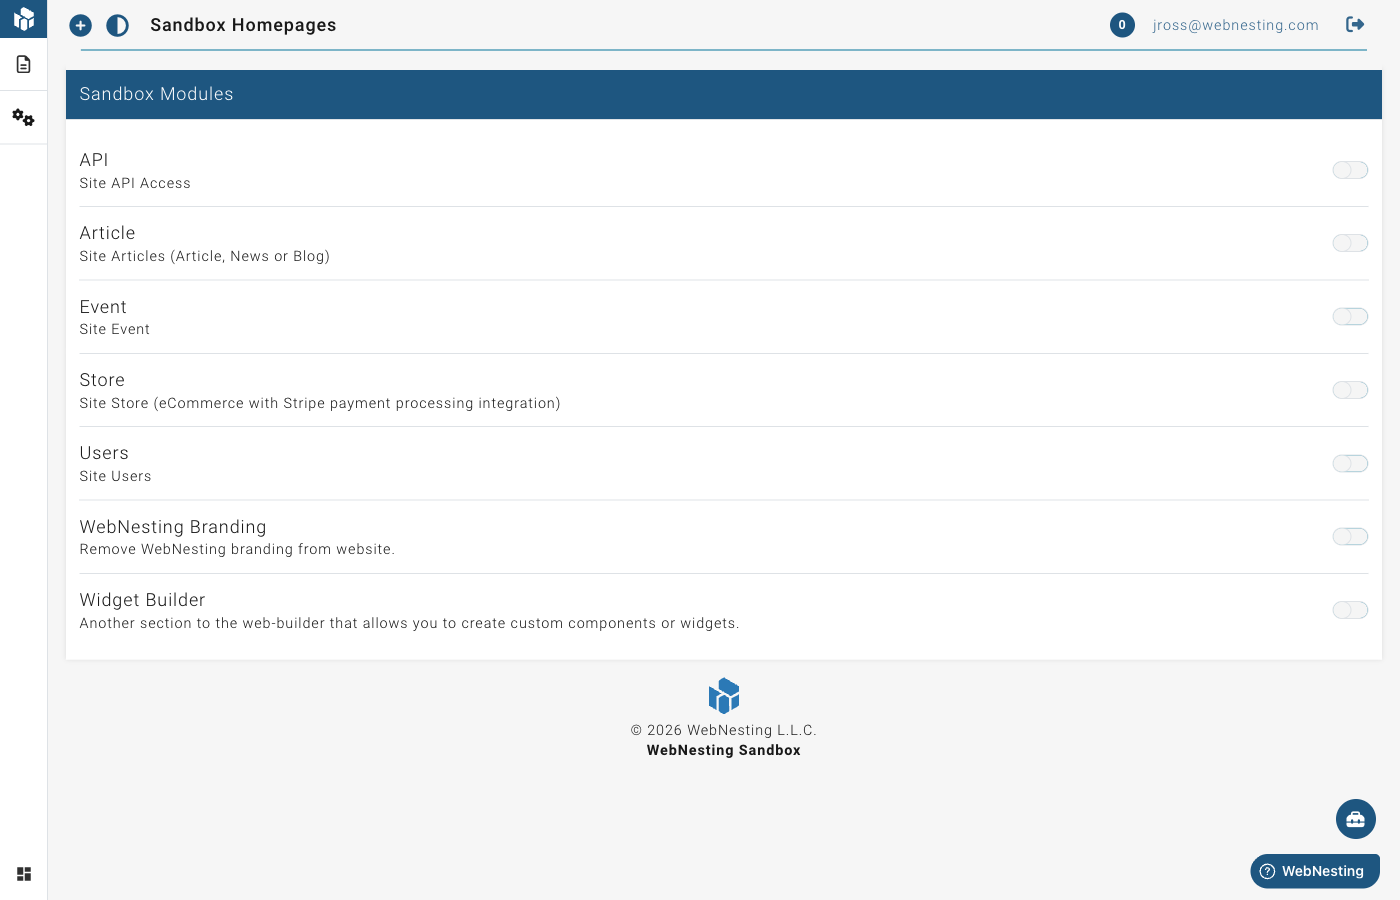
Each module shows its name, a short description of what it does, and its monthly cost.
How to Enable a Module
Turning on a module takes just a few seconds:
- Go to Modules in your dashboard menu.
- Find the module you want to enable.
- Click the Enable button next to it.
- The module will activate immediately.
Once a module is enabled, new menu items will appear in your dashboard. For example, enabling the Articles module adds an "Articles" section where you can create and manage blog posts.
Tip: You can enable and disable modules at any time. There are no long-term commitments.
How to Disable a Module
If you no longer need a module:
- Go to Modules in your dashboard menu.
- Find the module you want to turn off.
- Click the Disable button next to it.
- The module will be deactivated.
When you disable a module, its menu items will disappear from your dashboard. Your content is not deleted -- if you re-enable the module later, everything will still be there.
Tip: Disabling a module stops the monthly charge for it on your next billing cycle.
Module Pricing
Modules use simple, predictable pricing. Each module has a flat monthly fee that is the same regardless of how much you use it.
Here is how it works:
- You are only charged for modules you have enabled. If a module is off, it costs nothing.
- Charges are calculated based on how long a module is active. If you enable a module halfway through the month, you only pay for the time it was on.
- Module fees appear on your monthly bill. You can see a breakdown of all charges in your billing section.
Tip: Visit the Billing section of your account to see exactly what you are being charged for each month.
Available Modules
Here is a summary of each module you can add to your site.
Articles
Monthly cost: $5/month
The Articles module adds a full blogging and news section to your site. Use it to publish blog posts, company news, updates, or any written content you want to share with your visitors.
What you get when you enable it:
- An Articles section in your dashboard to create and manage posts
- A blog page on your published website where visitors can read your articles
- Tools for organizing articles with categories and tags
E-Commerce (Store)
Monthly cost: $20/month
The E-Commerce module turns your website into an online store. Sell physical or digital products, manage orders, and track your sales.
What you get when you enable it:
- A Store section in your dashboard for managing products
- Product pages on your published website
- Order management tools
- Support for product details like pricing, descriptions, and images
Events
Monthly cost: $5/month
The Events module lets you create and manage event listings on your site. Perfect for businesses that host classes, workshops, meetups, or any kind of gathering.
What you get when you enable it:
- An Events section in your dashboard
- Event pages on your published website
- Tools for adding event details like dates, times, and descriptions
Event Showings and Ticketing
When you enable the Events module, you also get support for event showings and ticketing. This lets you:
- Set up multiple dates and times for the same event
- Manage ticket types and availability
- Track registrations
Tip: Event showings and ticketing are included with the Events module at no extra cost.
Email Marketing
Monthly cost: $25/month base + usage-based pricing for contacts and emails sent
The Email Marketing module adds contact management, mailing lists, tags, and email campaign tools to your site. Use it to collect newsletter signups, organize your audience, and send targeted email communications.
What you get when you enable it:
- A Marketing section in your dashboard for managing contacts, lists, tags, and settings
- A Marketing Signup component in the website builder for adding newsletter signup forms to any page
- Contact import from CSV files
- Double opt-in email confirmation
- Automatic unsubscribe handling
Additional pricing:
- $5/month per 1,000 contacts (first 500 contacts are free)
- $1/month per 1,000 emails sent (first 1,000 emails are free)
Tip: If you also have the Forms module enabled, form submissions can automatically create marketing contacts -- no manual data entry needed. See the Email Marketing guide for details.
Forms
Monthly cost: $10/month
The Forms module lets you build custom forms for your website -- contact forms, surveys, registration forms, feedback forms, and more. Includes conditional logic, multi-page forms, file uploads, reCAPTCHA, webhooks, and submission management.
What you get when you enable it:
- A Form section in your dashboard for building and managing forms
- A Form Embed component in the website builder for adding forms to any page
- Submission tracking with filtering, status management, and CSV export
- Email notifications when forms are submitted
- Built-in form templates to get started quickly
Tip: When both Forms and Email Marketing are enabled, form submissions automatically flow into your marketing contacts. This is one of the easiest ways to grow your email list.
API Access
Monthly cost: $50/month
API Access enables a REST API for your site, allowing external applications and services to read and write your site's data programmatically. This is useful for integrations with other tools, mobile apps, or custom automations.
What you can do with the API:
- Read content -- Pull pages, articles, products, events, and other content from your site into external applications.
- Write content -- Create or update content on your site from external tools, such as syncing product information from an inventory system.
- Integrate with other platforms -- Connect your WebNesting site to CRM systems, email marketing tools, custom mobile apps, or other business software.
Common use cases:
- Displaying your WebNesting content on a separate mobile app or kiosk
- Syncing product data between your online store and a point-of-sale system
- Automatically creating articles or events from an external content management workflow
- Building a custom dashboard that pulls data from multiple sources including your website
Tip: The API module is a technical feature that typically requires a developer to set up and use. If you are interested in connecting your site to other tools but are not sure how, reach out to your developer or contact WebNesting support for guidance.
Widget Builder
Monthly cost: $20/month
The Widget Builder lets you create custom, reusable components in the Website Builder. Once created, widgets can be dragged onto any page, making it easy to maintain consistent elements like call-to-action sections, testimonial blocks, or pricing cards across your site.
What you get when you enable it:
- A Widget Builder section in your dashboard
- Tools for designing and configuring custom widgets
- The ability to place widgets on any page of your site
Remove Branding
Monthly cost: $5/month
The Remove Branding module removes WebNesting branding from your published website, giving it a fully custom, professional look.
What Happens When You Enable a Module
When you turn on a module, a few things happen right away:
- New menu items appear. You will see new sections in your dashboard sidebar for managing the module's content.
- New page types become available. In the website builder, you can create pages that use the module's features (like product pages or blog post pages).
- Your billing is updated. The module's monthly fee starts counting from the moment you enable it.
There is no setup process or waiting time. Modules are ready to use the instant you enable them.
Tip: If you are not sure whether a module is right for you, enable it and try it out. You can always disable it later, and you will only be charged for the time it was active.
Last updated: February 15, 2026
Was this article helpful?
That’s Great!
Thank you for your feedback
Sorry! We couldn't be helpful
Thank you for your feedback
Feedback sent
We appreciate your effort and will try to fix the article