The Dashboard is your home base in WebNesting. It is where you manage everything about your site -- from editing pages to changing settings to reviewing how your site is performing. This guide will walk you through every part of the Dashboard so you always know where to find what you need.
The Dashboard Home Screen
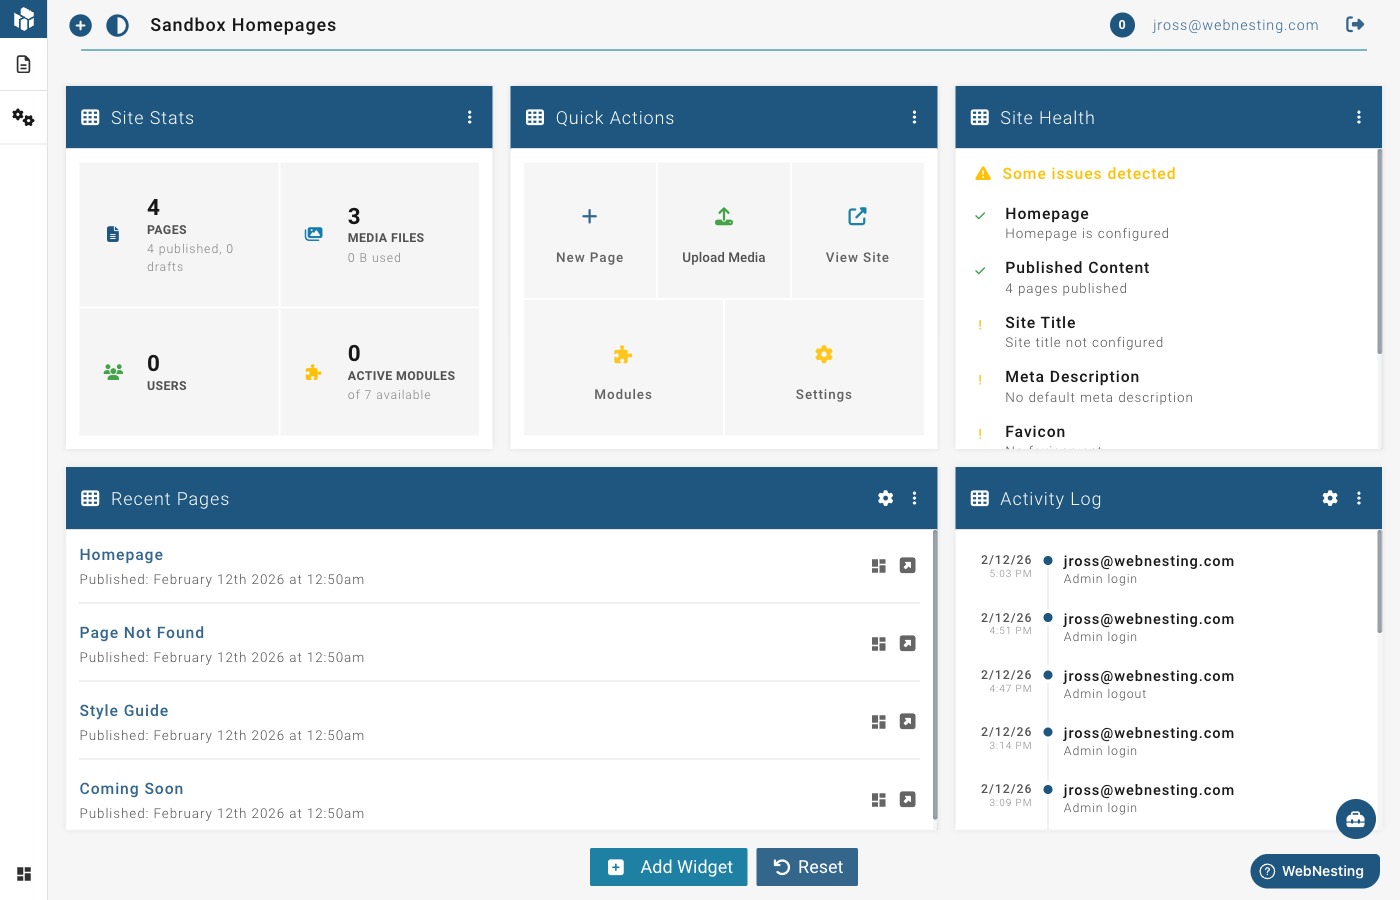
When you log in, the first thing you see is the Dashboard home screen. It shows a collection of widgets -- small panels that each display a different piece of useful information about your site.
What the Widgets Show
Here are the types of widgets you may see on your home screen:
- Site Stats -- A quick snapshot of your site's activity, like page views and visitor counts
- Recent Pages -- A list of pages you have recently created or edited, with quick links to open them
- Site Health -- A checkup on your site's status, letting you know if anything needs attention
- News & Updates -- Announcements and tips from WebNesting
Customizing Your Dashboard
You can personalize which widgets appear and how they are arranged:
- Add widgets -- Click the add button to browse available widgets and add new ones to your dashboard.
- Remove widgets -- Each widget has options to remove it if you do not need it.
- Rearrange widgets -- Drag and drop widgets to put them in the order that works best for you.
- Resize widgets -- Some widgets can be made wider or narrower to fit your preference.
- Widget settings -- Some widgets have a settings option that lets you adjust what they display (for example, how many items to show in a list).
Tip: You can always reset your dashboard back to the default layout if you want to start fresh.
The Top Toolbar
The toolbar runs across the top of every page in the Dashboard. It contains your most-used controls.
What the Controls Do
From left to right, here is what you will find:
- Menu button (the circular icon on the far left) -- Pins the left sidebar open so it stays visible. When not pinned, the sidebar expands on hover and collapses when your mouse moves away. On smaller screens, the sidebar hides automatically, and this button brings it back.
- Light/Dark mode toggle (the contrast icon) -- Switches the Dashboard between a light background and a dark background. Click it once to switch. Click again to switch back. WebNesting remembers your choice.
- Page title -- Shows the name of the section you are currently viewing (for example, "Pages" or "Settings").
- Your email address -- Displayed on the right side. Click it to go to your account page.
- Log out button -- The door icon on the far right. Click it to sign out of the Dashboard.
Tip: Dark mode is not just a style preference -- if you work in a dimly lit room, dark mode can be easier on your eyes. Try both and see which you prefer.
The Left Sidebar Navigation
The left sidebar is your main way to get around the Dashboard. It contains links to every section of your site management tools.
Opening and Closing the Sidebar
- On desktop, the sidebar is collapsed by default, showing only small icons. Hover over the sidebar to expand it and see the full labels. Move your mouse away and it collapses again. If you want the sidebar to stay open, click the menu button (pin icon) in the top toolbar to pin it in place. Click the pin again to unpin it and return to hover behavior.
- On phones and tablets, the sidebar tucks away automatically to give you more room. Tap the menu button to open it, then tap a link or tap outside the sidebar to close it.
When the sidebar is collapsed, it shows only icons for each section. Hover over the sidebar to expand it and see the full labels.
Sidebar Sections
The sidebar is organized into several main areas. Some sections expand to show sub-items when you click on them. Here is what each one leads to:
Dashboard Sections at a Glance
Pages
This is where you manage all the pages on your website.
- View your pages -- See a list of every page on your site
- Create new pages -- Add a new page and give it a title and URL
- Edit page settings -- Change a page's title, URL, visibility, and SEO information
- Open in Builder -- Jump into the visual Web-Builder to design any page
- Delete pages -- Remove pages you no longer need
- View deleted pages -- Access a list of pages you have deleted, with the option to restore them
Tip: Every page has its own SEO settings for title and description. Filling these in for each page helps search engines understand what each page is about.
Web-Builder
The Web-Builder is where you visually design your pages. Clicking this link opens the full-screen page editor.
In the Web-Builder, you can:
- Drag and drop components onto your page (text, images, buttons, cards, dividers, and more)
- Click on any element to edit its content directly
- Style elements by adjusting colors, spacing, fonts, borders, and more
- Preview your page on different screen sizes to make sure it looks great on phones, tablets, and desktops
- Save your work as a draft without publishing
- Publish your changes to make them live on your site
The Web-Builder has its own set of tools and toolbars. You will find a Save button and a Preview button at the top, along with controls for managing your page's components.
Tip: The Web-Builder uses a draft-and-publish system. This means you can make changes and save them without visitors seeing anything until you click Publish. Take your time getting things right.
Settings
The Settings section is where you configure how your site works and looks. Settings are organized into groups, and you may see some or all of the following:
- Site Config -- Your site name, admin path, SSL, and other foundational settings. Also includes SEO defaults (fallback title and description for pages that do not have their own)
- Content Items -- Images that represent your brand, including your logo, favicon, and social sharing image. Also includes ad-hoc messages and HTML content blocks
- Third Party -- Google Analytics tracking, Google Tag Manager, and social media profile links
To change a setting:
- Open the Settings section from the sidebar.
- Click on the specific settings group you want to edit.
- Make your changes.
- Click Save to apply them.
Media
The Media section is your file library. This is where all your uploaded images, documents, and other files are stored and organized.
- Browse your files -- See all uploaded media in a visual grid
- Upload new files -- Drag files from your computer or click the upload button
- Search and filter -- Find files quickly by name or type
- Use in your pages -- When editing a page in the Builder, you can pull images directly from your media library
Tip: Upload your images before you start building pages. That way, they are ready to use when you need them in the Builder.
Modules
Modules are add-on features that extend what your site can do. Think of them as apps you can turn on or off depending on what you need.
Examples of modules include:
- Article -- Add articles, news posts, or blog entries with categories and tags
- Event -- Create events with dates, showings, and ticket options
- Store -- Set up products and an online shop
- Form -- Build custom forms for contact, registration, and feedback
- Marketing Contact -- Collect and manage email subscribers, mailing lists, and campaigns
- And more, depending on your plan
To manage modules:
- Open the Modules section from the sidebar.
- Browse available modules.
- Enable or disable the ones you want.
When you enable a module, it creates its own section in the sidebar. For example, enabling the Article module adds an "Article" section where you can create and manage articles.
Each module may also add components to the Web-Builder, letting you display that module's content on your pages (like an article list or a product grid).
Permissions
The Permissions section lets you control who can do what on your site. If you have team members, collaborators, or employees who need access to the Dashboard, this is where you manage their access levels.
- View users -- See everyone who has access to your Dashboard
- Edit permissions -- Control what each person can see and do (for example, allow someone to edit pages but not change settings)
Tip: If you are the only person managing your site, you do not need to worry about permissions. This section becomes important when you start adding team members.
Redirects
Redirects let you send visitors from one URL to another. This is useful when you:
- Rename a page and want the old address to still work
- Move content from one page to another
- Link a short, memorable URL to a longer page address
To create a redirect:
- Open the Redirects section.
- Click the button to add a new redirect.
- Enter the old URL (where someone might go).
- Enter the new URL (where they should end up).
- Save your redirect.
Analytics
The Analytics section shows you how your site is performing. You can see:
- Visitor counts -- How many people are visiting your site
- Page views -- Which pages get the most traffic
- Traffic sources -- Where your visitors are coming from
- Device breakdown -- Whether visitors are using phones, tablets, or computers
- Trends over time -- How your traffic is changing day by day or week by week
Tip: Check your analytics regularly. It helps you understand what your visitors care about, so you can focus on improving the content and pages that matter most.
Logs
The Logs section provides a record of activity on your site. It can show you:
- Recent actions -- What has been changed on your site and when
- System events -- Technical events like errors or warnings
This section is mainly useful for troubleshooting if something does not seem right, or for keeping track of changes when multiple people are managing the site.
Switching Between Sections
Moving between sections is straightforward:
- Click any item in the left sidebar to go to that section.
- If a section has sub-items (shown by a small arrow), click the section name to expand it, then click the specific item you want.
- To go back to the Dashboard home screen, click the WebNesting logo or name at the top of the sidebar.
You can also navigate using any links within the page content. For example, clicking a page name in the Pages section will open that page's settings.
Quick Reference: Finding What You Need
| I want to... | Go to... |
|---|---|
| See my site stats | Dashboard home screen |
| Create or edit a page | Pages |
| Design my page visually | Web-Builder |
| Upload images | Media |
| Change my site name or logo | Settings > Site |
| Change my theme or colors | Settings > Theme |
| Add a blog or other feature | Modules |
| See who is visiting my site | Analytics |
| Set up a URL redirect | Redirects |
| Manage team access | Permissions |
| Check recent activity | Logs |
| Switch to dark mode | Click the contrast icon in the top toolbar |
| Log out | Click the door icon in the top toolbar |
Next Steps
Now that you know your way around the Dashboard, you are ready to start building. Here are some suggestions:
- Go to Pages and review the pages that were created by your starter template. Open one in the Builder to see how it is put together.
- Go to Media and upload your logo, photos, and any other images you want to use on your site.
- Go to Settings and make sure your site name, logo, and SEO information are set the way you want.
- Open the Web-Builder and start making the site your own. Replace the sample text and images with your real content.
Tip: You do not have to do everything at once. Start with one page, get it looking the way you want, and then move on to the next. Building a website is a step-by-step process, and WebNesting is designed to let you work at your own pace.
Last updated: February 13, 2026
Was this article helpful?
That’s Great!
Thank you for your feedback
Sorry! We couldn't be helpful
Thank you for your feedback
Feedback sent
We appreciate your effort and will try to fix the article